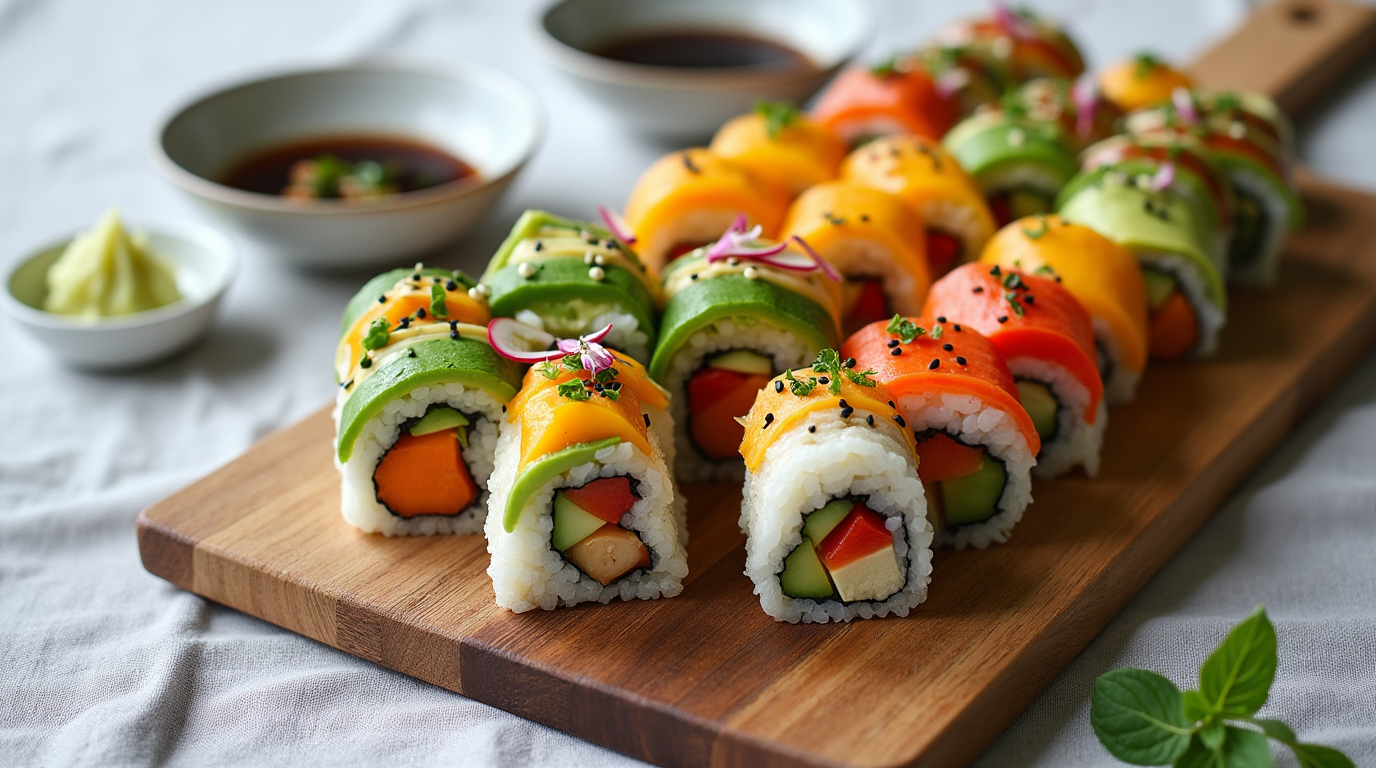
Vegan Sushi Platter: How to Make It in Under 30 Minutes
Introduction About Vegan Sushi Platter
When it comes to culinary adventures, creating your own Vegan Sushi Platter at home can be both an enjoyable and satisfying experience. Gone are the days when sushi was purely a seafood dish; the vegan movement has birthed a vibrant world of plant-based sushi creations that can easily be an art form in your kitchen.
What is Vegan Sushi?
Vegan sushi is a delightful twist on the traditional sushi we all know and love. Instead of fish and seafood, it incorporates a variety of fresh vegetables, fruits, and plant-based ingredients to create rolls that are equal parts beautiful and flavorful. At its base, you’ll find sushi rice, which serves as the canvas for a myriad of fillings ranging from avocado and cucumber to tofu and pickled radish.
What makes vegan sushi particularly exciting is its versatility. It allows anyone to explore their creativity and personalize each roll according to their taste palette. Whether you enjoy a simple Hosomaki with one filling or a more elaborate Uramaki featuring multiple ingredients, the options are practically endless!
Not only does vegan sushi cater to those following a plant-based lifestyle, but it also appeals to anyone looking for a healthier alternative to the classic version. Moreover, it’s a great way to introduce more vegetables into your diet, as each roll can be packed with nutritious options that enhance flavor and provide vitamins and minerals.
Benefits of Making Sushi at Home
Preparing your own vegan sushi at home offers numerous benefits that extend beyond just the culinary aspect. Here are some reasons I find it worthwhile:
- Freshness Guaranteed: Making sushi at home means you can choose the freshest ingredients. There’s something special about selecting ripe avocados or crisp cucumbers that makes the sushi taste all the more delectable.
- Cost-Effective: Dining out for sushi can quickly add up, especially if you have a penchant for ordering all the unique rolls on the menu. By making it at home, you significantly reduce costs. You can purchase ingredients in bulk, making it a budget-friendly option if you’re entertaining guests.
- Customizable: When you make sushi at home, you dictate what goes in each roll. Are you a fan of spicy flavors? Add some sriracha or pickled ginger to your sushi. Prefer a milder taste? Stick to creamy avocado and fresh cucumber. This level of customization means every sushi platter can cater to different preferences, including dietary restrictions or allergies.
- Fun for Gatherings: Preparing sushi can be a social event on its own. Invite friends over, and make it a sushi-making night where everyone can get involved. It’s a fun way to bond over food and creativity while sharing ideas and flavors.
- Learning Experience: Creating your own vegan sushi platter can be a learning experience that enhances your culinary skills. It’s a great way to familiarize yourself with slicing techniques, ingredient pairings, and the finesse required to roll sushi perfectly. Over time, you’ll see your skills improve, and mastering this art can be quite gratifying!
- Health Benefits: Homemade sushi allows you to control the ingredients and portions, making it a healthier option compared to store-bought or takeaway sushi. You can limit sodium levels by adjusting the amount of soy sauce used and choose organic ingredients when possible.
By choosing to embark on this sushi-making journey, you open up a world of flavors, textures, and creative expression. As we venture into the next sections, we’ll break down the essentials, from the necessary equipment to the key ingredients, ensuring you’re fully equipped to create an unforgettable Vegan Sushi Platter in your very own kitchen. Buckle up, and let’s dive deep into the world of homemade vegan sushi!
Essential Equipment for Making Sushi
Creating your very own Vegan Sushi Platter at home can be incredibly rewarding, not just for the delightful flavors but also for the fun of making it. However, before you dive into the sushi-making process, it’s crucial to gather the right tools. Having the essential equipment on hand can make a world of difference in both the efficiency and enjoyment of your sushi preparation. Let’s go through both the basic and optional tools that can help turn your sushi ambitions into a delicious reality.
Basic Tools Needed
When it comes to the necessary tools for sushi-making, there are a few essentials that you absolutely must have. Each tool plays a vital role in ensuring that your sushi rolls turn out perfectly every time.
- Sushi Mat (Makisu): This bamboo mat is essential for rolling sushi tightly and evenly. It allows you to create those beautifully shaped sushi rolls. I remember my first time using a sushi mat; it felt like I was unlocking a new skill!
- Cling Film: Wrapping your sushi mat with cling film is a nifty trick to prevent rice from sticking to the mat, making clean-up afterward a breeze.
- Big Bowl: A large bowl is necessary for washing the rice. Sushi rice needs to be rinsed multiple times to remove excess starch, so having a spacious bowl will makes this process simpler.
- Pot or Rice Cooker: You can prepare sushi rice in either a pot or a rice cooker. A rice cooker is great because it can cook the rice to perfection without much effort on your part. If you’re using a pot, just keep it covered and let the rice steam properly!
- Chopsticks: While you can always use a fork, traditional chopsticks can enhance the experience, and you can practice your skills outside of sushi-making too!
- Cutting Board and Sharp Knife: A good, sharp knife is imperative for slicing your sushi rolls cleanly. A blunt knife can crush your hard work! Personally, I found that using a serrated knife for the first cut often works wonders with the cleaner rolls.
Having these equipment at hand sets the foundation for a successful sushi-making session.
Optional Tools to Ease the Process
While the basic tools are essential, there are a few optional tools that can ease the process and elevate your sushi-making skills to the next level. Adding any of these tools to your kitchen arsenal can bring more convenience and creative opportunities:
- Rice Mold: These molds come in different shapes for creating nigiri sushi easily. If you’re looking to impress your friends with stylish sushi without the rolling, rice molds are your best friends!
- Sushi Rolling Machine: If you find rolling sushi tricky, a sushi rolling machine can be a game-changer. It can assist in creating evenly rolled sushi rolls without the fuss.
- Pasta Maker: Interestingly, some sushi enthusiasts use a pasta maker to roll out the sushi rice evenly or for making thin sheets of nori.
- Sushi Formers: These nifty gadgets help shape your sushi rice into perfect molds. They are particularly useful for making nigiri or gunkan sushi.
- Plates and Serving Dishes: Consider having beautiful plates to showcase your sushi creations! Presentation plays a huge role in sushi and can make your platter look just as delectable as it tastes.
As you gather your tools, don’t hesitate to personalize your setup. I often find joy in collecting unique dishware and utensils that make my culinary experiences even more enjoyable. The better equipped you are, the more relaxed you’ll feel in the kitchen when it’s time to create your delicious Vegan Sushi Platter.
With the right tools at your disposal, you’re ready to dive into the exciting process of sushi crafting. Whether you’re a seasoned chef or a complete novice, having the correct equipment will undoubtedly enhance the experience, making it both fun and fulfilling. Let’s move on to the next phase of making that scrumptious vegan sushi—choosing the right ingredients!
Key Ingredients for Vegan Sushi
Now that you’re equipped with the right tools to make your Vegan Sushi Platter, it’s time to focus on the key ingredients that will bring your sushi creations to life. The foundation of delicious sushi lies in selecting the right components, from the rice to the fillings and garnishes. Let’s explore what you need to create a remarkable vegan sushi experience.
Sushi Rice Preparation
The cornerstone of any delicious sushi is the rice. For vegan sushi, it’s crucial to use high-quality short-grain sushi rice. This type of rice has a higher starch content, allowing it to stick together perfectly—a key characteristic of good sushi. Here’s how to prepare it:
- Rinse Thoroughly: Place the sushi rice in a large bowl and cover it with cold water. Use your hands to gently wash the rice, swirling it around until the water becomes milky. You’ll want to drain this water and repeat the washing until the water runs clear. This step removes excess starch and prevents the rice from being too sticky.
- Cook Properly: After rinsing, soak the washed rice in water for about 15 minutes. Then, cook it either in a rice cooker or on the stove. The perfect ratio is typically 1 part rice to 1.33 parts water. Following cooking, let the rice steam with the lid on for about 20 minutes.
- Season with Sushi Vinegar: Once cooked, add a mixture of rice vinegar, sugar, and salt to the rice while it’s still warm. Toss gently with a spatula to coat evenly, being careful not to mash the grains. The ideal flavor adds a pleasant tang that complements your fillings beautifully.
I remember one time, I used a little too much vinegar, and my sushi ended up tasting like a salad! So, finding that perfect balance is crucial.
Understanding Nori Sheets
Nori sheets are another essential ingredient for vegan sushi. These thin, dried sheets of seaweed provide flavor and structure to your rolls. Here’s what you need to know:
- Quality Matters: Look for high-quality nori that is green, shiny, and has a slightly crispy texture. It’s important to avoid sheets that look dull or have discoloration as they may not hold up well during rolling.
- Sizes: Nori sheets typically come in two sizes: the standard size (which is great for maki rolls) and larger sheets for wider rolls or hand rolls (temaki).
- Storage Tips: Store your nori in an airtight container away from moisture. Exposure can make the sheets soft and difficult to use.
I love the experience of toasting nori sheets briefly over an open flame for a smokier flavor before using them; just be careful not to overdo it!
Selecting Vegan Fillings
When it comes to vegan sushi, the fillings are what really allow you to get creative. Here’s a list of delicious options to consider:
- Fresh Vegetables:
- Cucumber
- Avocado
- Carrot
- Bell Pepper
- Mushrooms
- Proteins:
- Firm tofu (try marinating it beforehand)
- Tempeh for added texture
- Vegan alternatives like vegan tuna or salmon can elevate your rolls.
- Unique Additions:
- Sweet potato for a hint of sweetness
- Pickled radish for a zesty kick
- Vegan cream cheese can add a delightful rich creaminess to your rolls.
It’s all about balancing flavors and textures. I usually prep several fillings and let my guests choose their favorites for a truly interactive sushi night!
The Role of Garnishes
No sushi platter is complete without the right garnishes. They enhance the flavor and presentation, making the eating experience even more enjoyable. Here are some key components:
- Soy Sauce: A staple for dipping, soy sauce adds saltiness and umami to your sushi.
- Wasabi: This spicy green paste can wake up your palate. However, avoid mixing it into your soy sauce—it’s best served directly on the sushi rolls.
- Pickled Ginger (Gari): Its primary role is to cleanse your palate between different types of sushi, ensuring that each flavor shines.
- Sesame Seeds: Toasted sesame seeds sprinkled on top of sushi are not only visually appealing but also add a nutty flavor.
I never forget to have some extra garnishes, as they can level up a simple roll into a stunning dish!
By carefully selecting and preparing these key ingredients, you’ll set yourself up for sushi success. It’s all about playing with textures and flavors, and in the end, you’ll create a stunning Vegan Sushi Platter that impresses both the eyes and the taste buds. In the next section, we’ll explore the different types and shapes of sushi you can make!
Different Types and Shapes of Sushi
Now that we have explored the essential ingredients for your Vegan Sushi Platter, it’s time to dive into the exciting world of sushi types and shapes! The artistry of sushi-making extends far beyond the traditional rolls and offers a variety of styles to experiment with. Each type of sushi brings its own unique taste and presentation. Let’s delve into the different kinds of sushi you can create right in your kitchen.
Maki: Traditional Sushi Rolls
Maki, often recognized as the quintessential sushi roll, is what most people picture when they think of sushi. Maki is made by spreading sushi rice over a sheet of nori, adding fillings, and then rolling everything tightly.
- Hosomaki: This version features a single filling, such as cucumber or avocado, and is rolled into a smaller size for easy eating.
- Futomaki: This is a thicker version that incorporates multiple fillings, often colorful, making it a feast for the eyes as well.
I love making maki rolls because they’re not only delicious but also a fantastic way to showcase colorful vegetables. Creating a vibrant rainbow of ingredients feels like creating a masterpiece!
Inside-Out Rolls (Uramaki)
Unlike traditional maki, inside-out rolls (uranmaki) have the rice on the outside and the nori wrapped around the filling. This style is often more popular in Western sushi restaurants and allows for beautiful presentations with sprinkles of sesame seeds or garnishes atop the rice.
- Technique: Start by spreading sushi rice on a sheet of nori, flip it over, and then layer your fillings before rolling. It’s a great technique to showcase visually appealing ingredients!
During my first attempt at making uramaki, I was pleasantly surprised by how much fun it was to experiment with different toppings. Adding sliced avocado on top made the rolls feel luxurious!
Crunchy Rolls (Age Sushi)
For those who love a bit of crunch in their sushi, age sushi provides a delightful twist. This variety involves coating either maki or inside-out rolls in panko breadcrumbs and then deep-frying them until golden brown and crispy.
- How to Prepare: After rolling the sushi, coat it in a mixture of flour, water, and soy flour followed by panko breadcrumbs, and then fry it in hot oil. The result? A crunchy delight!
I always recommend serving these with a drizzle of sweet soy sauce for a distinct contrast in flavors. These rolls often disappear quickly at any party!
Nigiri: Hand-formed Sushi
Nigiri sushi takes a different approach as it is hand-formed rather than rolled. This type features a small mound of sushi rice topped with a slice of your selected filling—be it avocado, tofu, or a vegan alternative such as vegan salmon.
- Tip: When shaping nigiri, make sure your hands are wet to prevent the rice from sticking. You can also dab a bit of wasabi beneath the topping for an extra kick.
Nigiri offers a chance to try creating shapes by hand. It feels more personal, almost like crafting little edible pieces of art!
Temaki: Hand-rolled Cones
Temaki, also known as hand rolls, is an informal and fun style of sushi where nori is rolled into a cone shape, filled with rice and various fillings, and eaten immediately after preparation.
- Customization: Guests can assemble their own temaki, mixing ingredients to their liking. Temaki can be filled with anything from vegetables to tofu, giving you the flexibility to cater to different tastes.
I often set up a temaki station during gatherings, allowing everyone to get involved in the process! It becomes a light-hearted way for friends to enjoy sushi together.
Gunkan Sushi: Boat-shaped Rolls
Gunkan sushi is a fascinating variation that resembles a little boat, perfect for holding toppings. The sushi rice is wrapped with a strip of nori, creating a small cup that is filled with various toppings like vegan caviar or chopped vegetables.
- Presentation: Gunkan sushi looks exquisite on a platter! Its unique shape can be an artistic highlight of your Vegan Sushi Platter.
My first experience making gunkan sushi left me in awe of its beauty. It’s a fantastic way to showcase delicate fillings like finely chopped mushrooms or other delicate ingredients.
By exploring these six different types of sushi, you can create a diverse and visually stunning Vegan Sushi Platter that will impress your guests. Each style offers its own unique blend of flavors and experiences, transforming a simple meal into a memorable celebration. In the next section, we’ll dive into a step-by-step guide for making your vegan sushi masterpiece!
Step-by-Step Guide to Making a Vegan Sushi Platter
Now that you’re all set with the right tools and ingredients, it’s time to get down to the fun part: assembling your very own Vegan Sushi Platter! This is where creativity shines, and I’m here to guide you through the process from start to finish. Let’s roll up our sleeves and dive into the delicious journey of sushi-making!
Preparing the Sushi Rice
The foundation of any great sushi is, of course, the rice. Here’s how to ensure your sushi rice is perfectly cooked and infused with just the right flavor:
- Wash the Rice: Begin by measuring about 600 grams (1.25 lbs) of short-grain sushi rice. Place the rice in a big bowl and cover it with cold water. Gently stir the rice with your hands to release excess starch. Keep washing until the water turns clear. This step is essential for getting that perfect sticky texture.
- Soak the Rice: After rinsing, drain the water and let the rice soak in fresh water for about 15 minutes. This will help the rice grains absorb moisture evenly, leading to a better texture once cooked.
- Cook the Rice: Transfer the soaked rice into a pot and add 800 ml (about 3.33 cups) of fresh water. Bring it to a boil, then cover and reduce the heat to low, allowing it to simmer for 8–10 minutes. Once cooked, remove from the heat, keeping the lid on, and let it rest for about 20 minutes.
- Season the Rice: While the rice cools, prepare sushi vinegar by mixing 80 ml (0.33 cup) of rice vinegar with 1 teaspoon of salt and 1.5 tablespoons of sugar until dissolved. Once the rice has cooled, transfer it to a large bowl and drizzle the sushi vinegar over it. Gently fold the vinegar into the rice—be careful not to mash the grains! Let the seasoned rice cool to room temperature.
The aroma of seasoned sushi rice fills your kitchen, and I can still remember the first time I got it just right. The key is patience and a gentle touch!
Assembling the Sushi Rolls
With your rice ready, it’s time to assemble the sushi rolls. This is where you can get really creative!
- Prepare Your Nori: Take a sheet of nori and place it shiny side down on your sushi mat. If you’re making inside-out rolls, you might want to flip the nori after placing the rice.
- Spread the Rice: With wet hands (to prevent sticking), take a handful of sushi rice and spread it evenly across the nori, leaving about an inch of space at the top. If you’re making inside-out rolls, use rice to cover the nori fully.
- Add Fillings: Lay your chosen fillings across the center of the rice. Here’s where you can have fun: choose whatever adds flavor, texture, and color. Consider combinations like marinated tofu and avocado or cucumber and bell pepper for added crunch.
- Roll It Up: Using the sushi mat, begin to roll the sushi tightly from the bottom to the top, tucking the fillings as you go. Apply gentle pressure to create a firm roll. Once you’ve rolled it to the top edge of the nori, wet it with a little water to seal.
- Cutting the Rolls: Using a sharp knife (this is important!), slice the roll into bite-sized pieces. Remember to clean your knife between cuts to maintain clean edges.
Sharing my sushi creations with friends is always a thrill! I often enjoy trying out various fillings and combinations that surprise and delight my guests.
Tips for Cutting and Serving
Once you’ve rolled and cut your sushi, it’s time for presentation. Here are a few tips to ensure your Vegan Sushi Platter looks just as good as it tastes:
- Presentation: Arrange the sushi pieces artfully on a serving platter. You can alternate colors and shapes for a visually appealing layout. Consider adding small bowls of soy sauce, wasabi, and pickled ginger alongside for dipping.
- Garnish: Sprinkle some toasted sesame seeds on top of your sushi for added flavor. You can also add sprigs of fresh herbs or a few pieces of sliced cucumber to liven up the platter.
- Serve Fresh: Sushi is best enjoyed fresh, so try to serve it immediately after making. If you must store it for a while, keep it in an airtight container, but consume it within a few hours for the best texture.
In my experience, bringing the sushi to the table and letting everyone pick their favorites adds an interactive touch to the meal. Watching the excitement as friends discover new flavors is one of the best parts!
With this step-by-step guide, you’re well on your way to creating a stunning Vegan Sushi Platter that’s sure to impress. In the following sections, we’ll explore some final tips for pairing and serving your sushi, ensuring the experience is as enjoyable as the preparation!
Final Tips for the Perfect Vegan Sushi Experience
Congratulations! You’ve made it to the final stage of creating a fantastic Vegan Sushi Platter. Before you present your beautiful sushi creation to friends and family, let’s explore some essential tips for pairing and serving, along with some sushi etiquette to enhance the overall experience. This section will ensure that not only does your sushi taste amazing, but it also shines in presentation and social engagement.
Suggestions for Pairing and Serving
Creating a sushi platter is not just about the sushi; it’s also about the accompaniments! Here are some fantastic ideas for pairing and serving that will elevate your vegan sushi presentation:
- Dipping Sauces: The traditional accompaniment is soy sauce, but you could also offer options like:
- Tamari (gluten-free soy sauce).
- Spicy mayo made from vegan mayo and Sriracha.
- Ponzu sauce for a citrusy kick.
- Garnishes: Fresh garnishes make your sushi visually appealing. Some great options include:
- Sliced green onions or scallions for a hint of freshness.
- A sprinkle of sesame seeds for added texture.
- Microgreens or edible flowers to enhance the visual presentation.
- Complementary Dishes: Consider preparing some side dishes to complement your sushi, such as:
- Edamame: Lightly salted and steamed for a healthy, protein-packed snack.
- Miso Soup: A warming soup that pairs wonderfully with sushi.
- Seaweed Salad: This adds a delightful crunch and complements the oceanic flavor of sushi.
I remember the first sushi night I hosted; I opted for miso soup on the side. The guests loved it and said the warmth and umami flavors were a perfect match with the fresh sushi!
- Beverage Pairing: A light, refreshing beverage can elevate your meal. Some ideas include:
- Green tea, which has a calming effect and complements the flavors well.
- Sake, which can enhance the cultural experience, so long as you’re ensuring your sake choice is vegan-friendly.
Sushi Etiquette and Rules
Sushi is not just about the food; it also comes with its own set of unwritten rules and etiquette that can enhance the dining experience. Here are some essential points to keep in mind:
- Chopstick Use: While many prefer using chopsticks, it’s perfectly acceptable to enjoy sushi with your hands—especially nigiri and temaki. Just remember to keep your hands clean and moist while enjoying your meal.
- Dipping Techniques: When it comes to soy sauce, it’s best to dip the fish or filling side into the sauce instead of the rice. This prevents the rice from soaking up too much liquid and falling apart.
- Using Wasabi: Instead of mixing wasabi directly into soy sauce (a common faux pas), apply a small amount directly onto your sushi piece. This way, you get a more intense flavor with each bite while respecting traditional customs.
- Ginger between Bites: Pickled ginger (gari) is meant to cleanse your palate, not as a topping for your sushi. Enjoy a piece of ginger between different types of sushi to refresh your taste buds.
- Eating Speed: It’s customary in sushi dining to eat your sushi as soon as it’s served for the best flavor and texture. This shows appreciation for the craftsmanship behind your meal.
I’ve had friends marvel at the complexities of sushi etiquette during dinner parties. It’s a great conversation starter to discuss the cultural significance of these practices, making the meal more enjoyable.
By incorporating these final tips for pairing and etiquette, your Vegan Sushi Platter will not only look incredible but also offer a delightful experience that celebrates the beauty and tradition of sushi. Now, gather friends and family, share your creations, and enjoy the delectable flavors of your hard work. Sushi night done right can create lasting memories filled with laughter, good food, and cherished moments!
Conclusion
As we wrap up this guide to creating your very own Vegan Sushi Platter, it’s time to reflect on the key steps that will lead you to sushi-making success. Whether you’re a seasoned chef or a novice in the kitchen, making sushi at home can be an incredibly rewarding experience that engages your creativity and taste buds alike.
Recap of Key Steps
Let’s quickly summarize the essential steps that we covered throughout this journey:
- Gather Your Equipment: Ensure you have all the necessary tools ready, including your sushi mat, sharp knife, and rice cooker (or pot). Having everything organized beforehand allows for smooth preparation.
- Prepare the Sushi Rice: The heart of any sushi dish is the rice. Remember to rinse, soak, and cook your short-grain sushi rice to achieve that perfect flavor and texture. The critical step is seasoning the rice with sushi vinegar while it’s still warm, allowing for maximum absorption.
- Choose Your Fillings: The beauty of vegan sushi lies in the variety of fillings you can use. From fresh vegetables to plant-based proteins, the options are limitless. Be adventurous and mix and match to create delightful flavor combinations!
- Assemble Your Sushi: Follow the techniques for different types of rolls like maki, inside-out rolls, and temaki. Rolling sushi can feel like an art form, and don’t hesitate to practice until you get the hang of it!
- Cut and Present: Once your rolls are made, use a sharp knife to cut them evenly. Presentation is key, so take some time to arrange your sushi artfully on a platter with accompanying sauces and garnishes.
- Pair and Enjoy: Don’t forget to serve your sushi with traditional sides like soy sauce, wasabi, and pickled ginger. Consider complementary dishes such as miso soup or edamame for a well-rounded meal.
In my own sushi-making experience, I have found that taking these steps made my process smoother and the results impressive. It’s like hosting my own little sushi restaurant at home!
Encouragement to Create Your Own Sushi Platter
As you embark on your culinary adventure to create a Vegan Sushi Platter, I encourage you to embrace the process with enthusiasm and creativity. Making sushi at home is not just about the final product; it’s about the joy of cooking and sharing food with loved ones. Here are a few thoughts to inspire you:
- Experiment Freely: Sushi is versatile! Don’t hesitate to try out new ingredients or combinations that speak to your preferences. Whether you want spicy, tangy, or sweet, the freedom to make it your own is what makes this experience special.
- Invite Friends and Family: Make your sushi night a social event! Set up a sushi-making station, invite friends or family, and encourage them to get involved. This interaction will make the experience more enjoyable and create lasting memories together. I’ve hosted sushi nights where each guest created their own rolls, and laughter-filled the atmosphere—what a delightful way to bond!
- Explore Beyond Sushi: Once you’re comfortable with making sushi, delve into other Asian dishes like tempura or seasonal stir-fries. This exploration will elevate your culinary skills further and enrich your repertoire of delicious meals.
- Have Fun: Remember, it’s all about enjoyment. Don’t stress about making everything perfect on your first try. Each roll you create, no matter its appearance, is a step towards mastering the art of sushi-making.
Creating your own Vegan Sushi Platter is a fulfilling and joyful undertaking. As you gather everyone around the table to savor your creations, take a moment to appreciate the flavors, the camaraderie, and the nourishing experience you’ve cultivated. Now, roll up your sleeves and let those sushi-making adventures begin! Happy sushi rolling!